Disclaimer
Unlike other Bloons games, your opponent in BTD Battles is a human capable of changing his strategy to counter yours. As a result, it is pointless to remove a strategy from this page because you used it and lost. That's a bit like trying to get a soccer website taken off the Internet because it suggested shooting from the left and the team you played against's goalkeeper was best against defending shots from the left.
Due to this, these strategies are more like guidelines. Sometimes, they won't work. Sometimes they will. Feel free to abandon a strategy if your opponent knows how to counter it.
Tips:
This is a set of guidelines players of btd battles should keep in mind before they have the medallions to buy a more independently powerful tower like the boomerang or ice tower. 1. In general when you have the 5 towers provided to you in the beginning, the dart monkey, tack shooter, ninja, sniper, and bomb tower, the tack shooter is utterly useless without access to the ring of fire or blade maelstrom and should always be avoided until you get those 4 tier upgrades for it. 2. For good camo detection, you should have several 3-2 ninjas and 2-3 dart monkeys for the main popping power of camo bloons, while you have at least 2 1-2 snipers to only pop lead camos. 3. You should never plan to go into the late game because your chances of survival are low when many moabs and bfbs show up. For moab class popping power, use moab maulers with frag bombs to destroy them quickly. 4 Since your towers are cheap and your true key to defense is quantity of towers over quality, you do not need to worry about economy as long as it is decent( a decent income might be between 800-10000) then focus on defeating your opponents. 5. when the time comes when you can afford them with your income, feel confident in spamming 2-3 ninjas and snipers, they solidify your camo detection and even your regen and regular bloon popping power as a whole.
A description of each tower's usefulness in BTD Battles:
- 1. Dart Monkey: Suprisingly, the dart monkey can be a very useful tower for beginners and experts alike. One use is to act as zebra and black bloon popping power for cluster bombs. Another use is utizling juggernauts and the super monkey fan club as a moab, bfb, and ceramic fighting tool as a team. Suprisingly you can only use dart monkeys as a tower with no support if you add new ones with the right upgrades at appropriate times.
- 2. Tack Shooter: A great tower for bloon popping power for players that have fourth tier tack shooters, otherwise the reliance of tack shooters is nearly useless. A single ring of fire can destroy a opponents regrow rainbow rush and 2 can destroy regrow ceramic rushes being solid bloon popping power throughout the game. The Blade maelstrom can be a life saving if high level bloons get past your ring of fire. Tack sprayers can be also used to help destroy the ceramic layer of bloons so the ring of fire can clean up the rest.
- 3. Sniper Monkey: Almost useless compared to the other towers performance. the Sniper Monkey does however have two very specific uses. For beginners the sniper can act as lead camo detection while ninjas clean up the rest. If you were unfortunate enough to get snipers as a random tower, 1-1 snipers have enough power to even destroy MOABs when massed, even though this is not recommended as an actual strategy.
- 4. Boomerang Thrower: Like the tack shooter, this tower can be used alone for bloon popping power or in combination with ice towers, bombs, or even ninjas. It is overall, a very flexible tower with many uses. Ricochets can be used for grouped regrows, and Bionic Boomers can act as a direct destroyer of ceramic layers and other non-grouped bloons. Even 2 tier boomerangs can be used in certain situations as black or white bloon popping power. The Glaive Lord is great if you can get it for camo detection and delivers a large portion of damage to MOAB-class bloons to. Turbo Charge is similar to the Blade Maelstrom as it can be a life saver for ceramics and MOABs that get too far.
- 5. Ninja Monkey: Beginners often thinks of ninjas as only for camo detection, but ninjas can be incredible moab and bloon popping power. Bloonjitzu with distraction can be great to stop regrow ceramics and zomg rushes if you have enough of them. A common technique is to combine a 2-2 or 3-2 ninja with a cluster bomb for a well rounded defense and also prevents mortar exploits as this tower is a automatic camo detector. Flash bomb is not recommended always because of the price, but the sabotage ability can be used throughout the late game to slow the bloons down.
- 6. Ice Monkey: The ice tower is a very effective tool against bloons and bloons alone. The arctic wind can slow bloons effectively enough to allow boomerangs to clean them up. Ice shards should be teamed with the arctic wind for total effectiveness. 4 tier ice towers are not essential unless you plan to go for "max" temples with the super monkey.
- 7. Glue Gunner: This is the most useless tower in BTD battles. In Bloons Monkey City and btd5's apocalypses mode, the glue gunner is a much more acceptable choice. Even the glue and ice tower strategy fails in the end with the glue gunners lack of MOAB popping power and expensive cost to get bloon remover which makes the gunner actually useful against ceramics.
- 8.Bomb Tower: It falls into that category with tack shooters, and boomerangs as a very flexibly useable tower. The cluster bomb and its fourth tier upgrade destroy bloons in a large radius by stalling them to allow other towers to inflict more damage. MOAB Maulers are one of the smartest and most cost efficient tools against MOABs and BFBs. The assassins can be used as a late game ZOMG eliminator.
- 9. Monkey Buccaneer: If you have a considerable amount of water on the course (hydro dam, battle park, battle river for example), this tower can be a very efficient tool against any bloons and even against rushes. A buy and sell monkey pirate strategy and destroy almost infinite moabs and bfbs sent if your defense cannot deal with them. Aircraft Carrier is useful but don't expect to get it until the late game. Like the ninja and apprentice, the buccaneer can be used to stop mortar exploits because of its easy to upgrade camo detection.
- 10. Monkey Ace: A not directly wise choice, but a great late game tower as a ground zero can be deadly to most all bloons on screen many moabs and ceramics. Spectres are also good but a little expensive in the early game.
- 11. Banana farm: This tower is up to you. If you dislike the bloon economy or even like having the money used to build them stock piled for rushes, use them. If you like bloon economy, you may never want to use them as a additonal income source.
- 12. Mortar: This can be disputes as the best camo detection along with the monkey village which is more expensive and does not actually damage bloons itself. The burny stuff is very useful against many bloons and it is very popular on hydro dam to use a mortar in the begining against the grouped reds and blues. If it is mainly for camo detection, get it around round 10-11ish. The artillery battery can stall any bloon except ZOMGs if sold and re-bought quickly enough making it a technique against rushes you cannot handle alone( warning: to make it efficient you need some other towers to still do damage to the bloons as the artillery alone will not solve your problems. 1 path 3rd tier is a waste of money and 1st path 4th tier is reserved for certain stages.
- 13. Dartling Gunner: The dartling gun is best suited for hydro dam where it can be placed on the top of the map where dam ends to shoot straight down at the bloons. The dartling gun combines camo detection with decent moab popping power. Hydra Rockets beats a laser cannon in its worth against grouped ceramics and moabs. Late game hydra pods, and rays of doom combined with moab assassins are a efficient late game combo. On the mobile version, do not pair Dartling Gunner with Banana Farms as they point to wherever you tap, which isn't useful when you need to constantly pick up bananas.
- 14. Monkey Village: A very good support tower in the late game. It can be used in place of a mortar for camo detection and the surrounding towers will always see the camos making the detection technically better than the mortar initially but more expense reducing your ability to get bloon economy than a mortar user. The first path fourth tier can maximize the moab assassins and the tech terror's efficiency by increasing the speed of the cool-down to re-use the ability.
- 15. Monkey Apprentice: In the mobile version, wizards seem much more popular to people because of their increased efficiency than the flash version. Wizards can indeed still be used as a tower, but is not particularly the best choice for beginners who cannot use them efficiently. Lightning is helpful. Disciples of Fire are much better than Disciples of Wind as they have a powerful attack against bloons and MOABs alike. However, tornadoes can still be used in combination to push stray ceramics back to the fire wizards. Fourth tier is up to you. They are powerful but not at all necessary to a great defense. They do not bode well against spaced bloons.
- 16. Super Monkey: This tower will always be the most powerful but not the best in cost. To fully utilize this powerful tower, a strong bloon income should be built to get the plasma and robo monkey upgrades to start.
- 17. Spike Factory: Extremely useful tower for Defense and Assault alike. They're usually best to be placed at the end of the track, to stop any bloons that might get out. MOAB SHREDR spikes can shred many MOAB class before it reaches any other towers. However, you might need a Cripple MOAB or Bloon Impact to stall nearby bloons and MOABs so that the Spike Factory can lay down its spikes quick enough.
Towers exclusive to the iOS version
- 18. Monkey Engineer: Many of these, combined with sentries, are extremely effective against almost every bloon. Cleansing Foam is effective in bunches, and Bloon traps can trap a bunch of bloons, and also get you cash to build more engineers. However, these are not recommended to be the MAIN defense against camo. You probably want to get a bomb tower to pop the leads, despite Cleansing Foam doing most of that job.
- 19. Bloonchipper: Bloonchippers are useful in the early rounds; however, due to increasing number of bloons and MOABs in the later rounds, it would be advised to just get 4/2 bloonchippers to shred MOAB class before it reaches other bloons. Overall, they're an OK defense. Just make sure you have towers nearby to pop camo bloons.
- 20. Heli Pilot: Effective tower in the later rounds. Razor Rotors are effective in ripping up even more bloons, and Downdraft can bring bloons back to the start. Quad Darts can take down even more bloons, and Apache Dartship is effective for taking down many bloons, excluding the mighty ZOMG.
- 21. Monkey Sub: Monkey subs are extremely popular, not only because it's mobile exclusive, but because they are cheap and efficient in taking down bloon hordes. Advanced Intel and Airburst Darts make a great team, and a bunch of Ballistic Missiles should clear a MOAB and maybe a BFB. FSC should be bought later, when you have more money.
Strategy List:
Strategies requiring  0 (available towers: Dart Monkey, Tack Shooter, Sniper Monkey, Ninja Monkey, Bomb Tower)
- 1. Strategy 1: (Ninja, Sniper, Optional, Optional)
- Start with a ninja.
- Upgrade it to 2/1 as fast as possible starting with seeking shuriken.
- Start spamming bloons in a pattern (2 grouped then 1 spreaded and repeat).
- If your opponent sends bloons:
- Place another ninja and upgrade it to 2/2 while upgrading the other one to 2/2 aswell.
- Place more ninjas as needed.
- After you are done upgrading a ninja/s place a sniper and upgrade it to 1/0 and set it on strong.
- Once you unlock regrow start using all your money to spam regrow yellows.
- If this attack defeats them then congratulations.
- If this attack doesnt defeat them then move one with the strategy.
- After your regrow yellows attack stop spamming bloons unless you the regrow yelow attack almost finished him off then spam those.
- 1 round before you get camo, upgrade your sniper to 1/2; Keep adding towers if you need.
- On the same round look at your opponent to see if he has camo detection or the ability to pop lead bloons.
- If the opponent doesn't have camo detection (which is very rare to find) spam camo pinks.
- If the opponent doesn't have lead detection then send regular lead bloons.
- If the opponent has both camo and lead detection then dont send anything.
- If you still haven't defeated your opponent then whats left to do is wait till you can send ceramics and spam them before your opponent does.
- If you still haven't won or got defeated whats left to do is to keep spamming bloons and wait till you get to moab to finish him off.
Strategies requiring 50 (available towers: all towers mentioned above plus the Ice Tower, Boomerang Thrower, Glue Gunner and Monkey Buccaneer)
- 1. Strategy 1: (Buccaneer, Boomerang, Optional, Optional) This strategy is for levels with water.
- Start with a buccaneer.
- Upgrade it to fast firing and long range as soon as possible.
- Get a boomerang thrower.
- Get the bionic boomer before getting any upgrades on the other path (after upgrading to bionic boomer, you can do the other path.)
- Get the destroyer upgrade on your buccaneer
- Buy another one, and upgrade this one to cannon ship.
- See if your opponent has defense against Camo Leads.
- If they don't, send as many as possible at them.
- If they do, use Regrow Rainbows.
- If you still don't win, I would get more bionic boomers, but if you have a different favorite tower, then use whatever you want.
- 2. Ninja Boomer: (Ninja, Tack Shooter, Boomerang, Optional)
- First get a ninja monkey.
- Upgrade it 3/2.
- Buy some tack shooters and place them in convenient positions (often round corners is a good idea).
- Upgrade them 3/2.
- Get 4 boomerang monkeys.
- Upgrade them to 3/2 and 2/3
- Send in some ceramic bloons and fast bloons until your opponent is defeated.
- 2. Ninja Boomer II:(Boomerang, Ninja, Optional, Optional)
- First place a boomerang.
- Upgrade it to 3/2
- Wait until you have $3000 or more
- Place another 3/2 boomerang.
- Get some 3/2 ninja monkeys for camo dectection.
- Save up your money until round 13.
- With the money send regrow rainbow bloons with all your money and your opponent is defeated.
- Note that attacks from the opponent will maybe decrease your chance a bit to be the winner.
Strategies requiring 250 (available towers: all towers above plus Monkey Ace, Mortar Tower, Spike Factory and Dartling Gun)
- 1. Camownage: (Mortar, Tack Shooter, Spike Factory, Boomerang)
- Start off with a tack shooter in a corner, then get a boomerang ASAP.
- When you can, get a mortar and a factory.
- If the track is Cards, Temple, or Bloontonium Mine, aim the mortar at the spot where the two paths meet.
- If not, aim the mortar at where bloons spawned by your enemy come out.
- Upgrade the tack shooter to 3/2.
- Upgrade the boomer to 3/2.
- Upgrade the mortar to 2/3.
- Upgrade the factory to 2/2.
- Send out CLoDs, CoDs, RRoDs, and MOAB's until your opponent dies.
- 2. Aqua Camownage: (Mortar, Buccaneer, Spike Factory, Boomerang) Same as Camownage, but for levels with water.
- Follow the Camownage strategy, but use Cannon Ships instead of Tack Shooters.
- Once the threat of Camo Leads is over, sell the cannon ships and get destroyers.
- 3. Tack-tical Spikes: (Spike Factory, Tack Shooter, Bomb Tower, Optional)
- Start off with a Tack Shooter and upgrade it 2/1
- Repeat 3 times.
- When you can afford a Spike Factory, place it near the end.
- At the end of the round, sell the Tack Shooters and upgrade your Spike Factory, keep upgrading until it is 3/2.
- Buy another Spike Factory and upgrade it to 3/2 again.
- Buy a Bomb Tower whenever you can and upgrade until 3/2
- Buy another Bomb Tower, but this time upgrade it to 2/3.
- Now place as many 3/2 Spike Factories as you can.
- On round 30-40, or when your income is at least 3000, send whatever bloon rush you think will vanquish your opponent.
- 4. Tack-tical Spikes ALT 1: '(Spike Factory, Tack Shooter, Bomb Tower, Optional)
- Follow the Tack-tical Spikes strategy, except instead of tack shooters at the start, instantly put the Bomb Tower, and upgrade to 3/2, then buy the Spike Factories.
- Continue on with the normal Tack-tical Spikes,without buying another 3/2 Bomb Tower. Continue on with normal Tack-tical spikes again, but instead of sending Rainbows, send a BFB or MOAB.
- 5. Tack/ Cannon Destruction (Tack Shooter (Tier 4), Bomb Tower, Mortar Tower, Monkey Ace (Tier 4) This strategy works on every map except Zen Garden and Hydro Dam.
- Open with a Bomb Tower set to close.
- Buy a tack shooter.
- As soon as round 2 starts, spam grouped reds at your opponent, to get lots of income.
- Don't buy the 1/0 upgrade on the tack shooter right away, but buy it on round 3.
- Buy the 3/0 upgrade on the tack shooter by round 4. (Keep sending reds while doing this.)
- As round 4 hits, send grouped blues instead of grouped reds.
- Don't buy anything until round 6, in which you get a second tack shooter, upgraded 2/0.
- Start sending lots of grouped greens against your opponent until your income is 600.
- Save up your money (To about 1000)
- To make this easier, sell the 2/0 tack shooter and the cannon and upgrade the 3/0 tack shooter to 4/2.
- Send grouped yellows to get economy up until round 10. ( Your economy should be around 750.)
- Buy a mortar tower and upgrade it to 0/3, then 2/3, before round 12.
- Buy a 3/0 tack shooter by round 13, ( Unless your opponent is extremly vulnerable to regrow rainbows, in which case finish him off)
- Get another one up by round 15.
- Send grouped pinks up until mid round 16. (You should have 800 income.)
- Buy 2 2/3 moab maulers by round 18, to defend against any regrow moab rushes. (Put the maulers on strong).
- Keep sending grouped pinks up until round 20. ( You should have 1000 income)
- Get two more maulers, and save up for a 0/4 monkey ace.
- Send grouped pinks up until round 25. (You should have 1600 income), and save up your money.
- Unless your opponent has a ground zero,(In which case rush them with ZOMGs on round 30), rush your opponent with Fast Cooldown Regrow BFBs, and put some Fast Cooldown Camo Ceramics under them if your opponent has a mortar as full camo detection on round 30.
- 6. Tact Shooter. (Tack Shooter, Bomb Tower, Mortar Tower, Optional (all Tier 4's MUST be unlocked)
- Open with a 3/2 tack sprayer.
- Start sending economy balloons.
- When grouped blues become availible, get a bomb. Set it to target priority close.
- Keep increasing your eco until it reaches about 420.
- Sell the bomb tower and buy Ring of Fire (ROF).
- Keep sending economy balloons until the very end of round 10.
- Next, a WELL POSITIONED Mortar Tower needs to be upgraded to 2/3.
- This step is important: buy ROF. This will counter a regrow rainbow rush.
- To take care of ceramics, get another 2 tack sprayers, but DO NOT upgrade to ROF.
- Keep increasing your eco until the start of round 17. When this happens, put up 2 MOAB Maulers.
- By Round 20, you will need an Assassin.
- If the opponent BFBs you, use the ability to pop the BFB.
- If you need to, sell the assassin and buy another. Keep doing this until the BFB has been converted to creamics.
- You've got clear skies ahead of you: You can get you eco up to 1400ish, and then buy more MOAB maulers.
- For every 7 Maulers, buy one Assassin.
- To defense an all out FC BFB rush, upgrade your Mortar to 2/4.
- Use the ability, sell it, buy another one, and use the ability again. This will paralize everything while your towers continue to shoot.
- If you want to kill the opponent early, try a regrow white/yellow rush.
- If they have a single tower to pop grouped balloons, the whites will slide past. If they have a fast shooter, the yellows will slide past. (Do not do this if they have an ROF or a Bionic Boomer and Glaive Ricochet combo.)
- For later game, try mortar exploiting, camo leads, regrow rainbows, or a regrow BFB.
- If none of these work, send a regrow ZOMG on round 30. (This will work because before round 30, all MOAB class balloons that you send will enter the field with half health.)
- This will work for all tracks but Zen Garden, Cards, Ice Flow, and Hydrodam. But seriously, what does work on any of these???
- 7. 5 Tower combo that is worth using (Ace, Boomerang, Ice, Bomb, Mortar) This strategy only works on Cards.
- This is a balanced group of towers that can maximize your defense early game or late game depending on how long the game is.
- First get an ice tower with permafrost on the curve in the path at the top of the card.
- Get a 1-1 boomerang to actually pop the bloons the icetower stalls.
- By round 4, it would be best to have a 2-3 boomerang to deal with any pinks that get past the ice(by the way, your boomerang should be in the right corner curve just below the ice tower).
- After that, you should get a 3-2 boomerang when the path is two parallel lines by round 8 which will be the solution for regrow whites.
- The next step is to have a mortar for camo detections aimed at the left corner of the path( the corner with no tower in it).
- Get either a cluster bomb or a glaive ricochet along with some low level icetowers to deal with regrow rainbows and ceramics.
- Get moab maulers after that for moab popping power(2-3 is good).
- From here, your tower choices should be made on a few principles.
- As bfbs and zomgs become unlocked, you should continue to increase your mauler amount.
- The aces you create around round 24-32 should only be ground zeros and should only be activated when moabs and ceramics are getting past the top ice tower.
- Just under your glaive ricochet, a artic wind is a good choice to stop ceramics in thier tracks.
- To get a 100% camo proof defense in the late game, use artillary batteries, and even glaive lords which can be used as additional damage to blimps as well.
- And finally, when all else fails it is best to mortar stall everything until the threat is gone.
- .'8. Explosive Results: (Bomb Tower, Mortar, Optional, Ice Tower)
- Start off with a Mortar
- Upgrade to 3/2.
- Save up for another Mortar and place it next to the other Mortar.
- Upgrade the new Mortar to 3/2
- Repeat this process until you have 4 Mortars.
- Buy a fifth Mortar, but this time, upgrade to 2/3.
- Place a Bomb Tower 2/3 for MOABs.
- Place an Ice Tower to try and cover the whole map, with atleast 1-2.
- You should out last your enemy, also, to get more money, send bloons.
Strategies requiring  500 (available towers: all towers)
- 2. Sniped (Sniper, Ninja Monkey, Monkey Apprentice, Optional):
- First get a bunch of snipers in rounds 1-5. Do not upgrade them.
- On rounds 2-4, get a ninja and an apprentice. In the meantime, spam the opponent.
- Upgrade the ninja and the apprentice 2/2.
- Get extra snipers, and set one aside as the "Special". Upgrade it 2/2, then send a lead rush.
- If they have bomb towers, spam with camo leads. You will win eventually.
- 3. Long battles : (Dart monkey , Banana Farm , Super Monkey, Optional)
- Start off with a banana farm 1/0 and use road spikes to pop bloons
- Get a 3/2 dart monkey
- Upgrade banana farm 2/0
- Get another 3/2 dart monkey
- Get another banana farm and upgrade it to 2/0
- Get two dart monkeys
- Upgrade them both to 4/2
- Get income until you get 1000
- Sell banana farm
- Get robo monkey
- Get more income
- 4. March 8th 2013: (Boomerang Thrower , Bomb Tower (tier 4 unlocked), Village, Super Monkey)
- Start with a boomerang played bionic arm first
- Buy Multi-Target and then Glaive Thrower (placement is extremely important!)
- Start sending in the highest grouped bloons until around the middle of round 7. (450-700 income, but varies with map and opponent's strategy)
- If the placement is good, then you will never have to worry about bloons escaping.
- If you have income around 550+, get another 2/3 Boomerang Thrower, especially when you think they are prepping to rush you.
- If not, then get a 0/2 Monkey Village.(somewhere between round 10-12) This counters Camo Bloons.
- Then, get a second, or if you have money, get a third.
- For some reason, a 0/1 Monkey village doubles the popping power of glaive ricocchet, allowing a 3/2 boomerang thrower to pop twice the bloons (twice damage of two glaives)
- 5. Sam Wang: (Spike Factory, Boomerang, Apprentice, Banana Farm)
- Start with a spike factory near the end
- Upgrade it to 1/0 ASAP.
- Place two boomerang throwers at the front, one upgraded to 3/2 and the other 2/3, with the 3/2 set to strong and 2/3 set to first.
- Upgrade your spike factory to 2/2 and if you can purchase an apprentice or a farm, follow these instructions. If you can't do any then ignore the following.
- Apprentice: Upgrade it to 2/2 as fast as possible, and then get more if you can.
- Banana Farm: Upgrade it to 3/0, or possibly 4/0 if you've unlocked it. Upgrade the second path last. Get another banana farm if you can. Simply hover your mouse over the bananas to collect it.
- Both:Get the banana farm first. Upgrade it to 1/0, then get the apprentice. The apprentice should be upgraded to 2/2 before upgrading the banana farm again.
- 6. Strategy 6: (Boomerang, Apprentice, Ninja, Optional)
- Get a boomerang thrower and upgrade it to 2/3.
- Get a monkey apprentice and upgrade it to 2/2.
- Keep sending regen whites.
- If your opponent doesn't lose, get a ninja monkey and upgrade it to 3/2. Then sell it and send in a rainbow regen rush.
- If your opponent survives that, next time, don't send the whites and just get a little income, sell the ninja AND the apprentice and send $7,000 (or $8,000 if your lucky) of rainbow regens.
- 7. For players 500+ playing players 500-: (Boomerang, Apprentice, Optional, Optional)
- Get 2 Glaive Riccochets and place near the end.
- Around round 7 or 8, sell them and buy a 2/2 Monkey Apprentice.
- Then continuously send a White Regen rush up to round 10.
- At round 10 buy another 2/2 Apprentice.
- When you can, stop sending white regens and send zebra regen.
- Your enemy should die in round 12.
- 8. Strategy 8: (Boomerang, Apprentice, Bomb Tower, Optional)
- Get the Boomerang Thrower and upgrade it to 1/3.
- Send in pink bloons (spaced) until you get 300 income change.
- If your opponent retaliates back, put a Monkey Apprentice 1/2.
- If your opponent didn't send bloons back at you, buy it anyway.
- Save your money until you get Lighting strike
- Send blacks until you unlock White Bloons, then send whites. Get about 400 income.
- Try to save enough for a Summon Whirlwind.
- Ignore all bloons you can send and focus on getting 2 wizards with 3/2. (You will get 2 wizards by the time round 15 is around, thats the time your opponent might send ceramics, so beware.)
- Buy a Boomerang tower 1/3 just like the start of the match.
- Buy 2 M.O.A.B. maulers
- At this point, you pretty much should stack on bionic boomers, whirlwind wizards, and M.O.A.B maulers. Send in zebras as regulars for round 21. Your goal is to get a lot of income.
- 9. Assualt mode only: (Glue Gunner, Boomerang, Bomb Tower(tier 4 unlocked), Monkey Village)
- Start out with your boomerang thrower and sent in group reds.
- Get a bionic boomer with glaives before they sent in blacks (pinks if you must).
- Carry on building up your income till you get around 500.
- Buy a glue gunner and try to have it so it catches opponents bloons and still gets normal round ones.
- If you're too late you'll need to get monkey village by round 12 first.
- Upgrade the monkey village so it has camo detection (makesure it covers the bionic boomer and try to cover the glue gunner).
- Get a 3/2 boomerang thrower then a 3/2 glue gunner. Make sure your glue gunner has camo detection now.
- Build one 2/3 bomb tower before MOAB comes.
- Start building tonnes of bionic boomers and moab maulers.
- Once you feel you've got enough bomb towers then focus on bionic boomers.
- If you start to get really bored either camo regen ceramic rush your opponent or build up your income and sent in a ZOMG (if they have too good of defense then your best chance is just to keep regen rainbow rushing them).
- If you can not defeat your opponent just focus on defenses and wait till either one of you die out.
- 7. Magic Camownage: (Apprentice, Buccaneer/Tack Shooter, Spike Factory, Boomerang)
- Like Camownage, but use Dragon's Breath instead of Mortars.
- 8. OP Outback Village Farmers with Cannons: (Boomerang, Bomb Tower, Banana Farm, Monkey Village)
- Start with boomerang somewhere mid map and upgrade 3/0 before sending red or blue bloons.
- Keep sending bloons till you reach 270 money.
- Now add another boomerang near the first one and upgrade to 2/0.
- Start sending pink bloons until you reach 315 money.
- At this point, if your opponent isn't assaulting you with pink bloons (if they DO, save to upgrade 2nd boomer to 1/3 first) save money for your first banana farm and upgrade to 1/0.
- Now send black bloons till you're at 350 money.
- If you're not being pressured by your opponent you can get your second banana farm 1/0...otherwise get bomb tower 2/0 near your boomers, then banana farm 1/0.
- Now save up for Monkey Village. Place village within range of your three towers (your two boomers and bomb).
- Upgrade your boomerangs to 3/2 and 2/3 respectively.
- Now start sending yellows your opponent's way till you reach 400 money.
- Upgrade your bomb tower to 3/0.
- Now if you timed this right, you should be right at the start of round 12. IMMEDIATELY sell both banana farms and upgrade your monkey village to 0/2 so your three towers can stop camo lead, or anything else they throw at you.
- Send the killing blow with your own camo-lead OR if they have good defence for this keep barraging with zebra bloons to build up your money to 500.
- By then you'll hit round 15 with about 2000 cash...finish them with a combo of 4 grouped zebras and immediately follow with 4 ceramic regen bloons. By using fast grouped bloons to *hide* your high defence regens, they will slip through even with a very strong defense.
- 9. Dragon's Farm: (Apprentice, Dartling Gun, Banana Plantation, Optional)
- This is a strategy for maps with reasonable space for the plantations.
- Start off with an apprentice near front lines so his line of fire can take out multiple bloons at once and upgrade him to 1/0 instantly.
- Upgrade him to 2/0 ASAP.
- Then if your enemy doesn't seem to be rushing with bloons get a plantation, upgrade it to 1/0, and then get a dartling.
- If he does rush get a dartling first then get a plantation.
- From round 4 onwards you should be spamming with the pink bloons trying to increase income. Then black, then white.
- Only continue rushing with white bloons unless your opponent can't defend a certain bloon past it and is dying.
- Get the plantation to 2/0 during this process and proceed to get another plantation and try to get it to the same level.
- Once you have your farm set up, continue rushing bloons and wait til you have enough to get a 2/3 apprentice.
- If you have trouble defending, upgrade to a 2/1 dartling before this.
- Stop rushing at a $400 income; the plantations will take care of the rest.
- Once you have a 2/3 apprentice simply save up for 2/3 dartling.
- If your opponent can't stop them, just send a moab or camo ceramics and kill him. Else, continue getting 2/3 dartlings.
- If you get to round 25, get another plantation at 2/0.
- From this point on, you can either get a tempest (4/2) apprentice or continue getting more rocket (2/3) dartlings. I suggest the latter as it is far more effective on moabs.
- 10. SW8573: (Boomerang Thrower, Bomb Tower, Monkey Ace, and either Mortar Tower or Monkey Village; works for all maps but Hydro Dam)
- One element this strategy depends on is Boomerang placement, whether it can loop around the track easily or not.
- Begin with a 0/0 Boomerang Thrower, and then a Bomb Tower as soon as the timer reaches 0:20 (slightly before Round 2 begins). Target priority can be adjusted for the Boomerang (to Last) depending on the map, while the Bomb should always be set to Close.
- Begin sending Red Bloons as soon as Round 2 begins.
- Without stopping the bloon-sending, slowly upgrade the Boomerang to 2/2.
- By Round 4, slow down the bloon-sending, continue sending either Grouped Reds, or Spaced Blues.
- Upgrade the Boomerang to 2/3; sell the Bomb Tower if necessary.
- Once the Bionic Boomer is purchased, begin sending Grouped Blues and Greens.
- If your income is not yet at $600, continue with Yellows until your income reaches $600.
- However, be careful on Round 8 in case of Regen bloons; you might like to halt your income at $550 for a 3/0 Boomerang.
- If on Rally or Yin Yang, you might like to choose a Monkey Village for Camo detection. In this case, you should hold back on sending bloons and building towers. If the opponent is not rushing you with Camo Bloons on Round 12, continue to save your money. They would usually rush you on Round 12, or 13 - with Camos or Regens respectively. If Camos, build a 0/2 Village immediately; if Regens, build another 3/0 Boomerang immediately.
- On other maps, you would like to build a 2/3 Mortar Tower as soon as possible, usually aiming near U-shaped bends and loops.
- If your opponent has not rushed you, nor is their defence weak enough to die from a rush, purchase a 4/0 Bomb, followed by upgrading to 4/2 as soon as possible. Your next choice of tower, if their defence is solid enough to survive rushes, should be 2 2/3 Bombs, set to "Strong". At this point, you would like to conserve on sending bloons unless you are certain it will defeat the opponent. Towers should be built accordingly, with a 0/4 Monkey Ace being the emergency tower if your opponent rushes you with strong blimps such as BFBs or ZOMGs. At late-game rounds, you should aim to upgrade that Mortar (if used) to 2/4, and to purchase more 0/4 Monkey Aces and 2/4 Bombs, using abilities as necessary. Grouped Pinks should be your choice of bloons to send for increasing late-game income.
- 11: Rainbows Galore: (Boomerang Thrower, Bomb Tower, Mortar, Banana Farm, good for most maps)
- Start off with a Boomerang and upgrade it to 3/0 (if you think your enemy will rush you with group bloons) or 2/3 (if the enemy will resort to using spaced, yet fast ones like pink).
- This will take good care of any opponent's bloon rushes for now.
- Once you are done, place a Banana Farm anywhere on the corners (most recommended) or available spaces of the map (if you can't put it on the corners) and start gathering money to get a Boomerang taking the other path of the first Boomerang you placed.
- If you reach Round 6, the best advisable rush is to use a mix of Blacks and Pinks; this is highly effective as most players do not care to set their targets to ones that fit their playstyle and therefore confuses the defenses of your opponent.
- It will have done some considerable damage after (very little to none if your opponent is quite good at strategies).
- After that, build a Bomb Tower and upgrade it to 0/3 if your opponent has survived the previous rush, else Mortars on 2/3 (at intersection of main bloons and opponent bloon paths, else inbetween 2 paths that are close enough to any bloon at both areas) if you think the upcoming rush will defeat your opponent. The important part comes here.
- Start slowly building up money for the upcoming rush, more is better. You can first test your opponent's defenses by sending in one pack of non-regen Rainbows as early as possible. Your rush is more effecient, but it gives you a good look at the chances of your rush ending the game. Anywhere more than 5% is enough to probably end the game, closer to the path than that means your rush will attempt to pass through (does damage, but it doesn't end the game). If they get popped before they even appear on the map, chances are your rush won't work.
- Wait for Round 15 while building your strength up. The rush is very costly, and at the same time, very time-costing. Wait for Round 15. Once you are there, BAM! Your rush is ready for attack. Check Regen and press SHIFT+9 and SHIFT+8 one after another. How easy the rainbows are popped turn it into multiple regen bloons, which shield the ceramics. Along with the ceramic's defenses, most of the rush will go through and end the battle. Take note that while this rush works on even the best strategies, there are some which does beat this strategy. BTD 5 has shown that not even a Super Monkey (below 3rd upgrade of any path) could keep up to the rush's power. If your enemy DOES survive the attack, your chances of winning is extremely diminished unless you can build up enough money for an enhanced rush of your own, whilst still including Regen Ceramics and Regen Rainbows.
- 12. A Quick and Easy Death (Sniper Monkey, Boomerang Thrower, Super Monkey, Optional, Does not work for Hydro Dam or the one Swamp like track)
- Start off with a Sniper Monkey and upgrade it to Faster Firing as soon as possible.
- Buy a Boomerang thrower and put it near the beginning of the stage. Make sure to upgrade it with SonicBoom and Red Hot Rangs as soon as possible.
- When round 2 starts, send either Blue or Red bloons, whichever you find better.
- When round 3 starts, upgrade the Sniper Monkey with Full Metal Jacket, and set its target to "Strong". At this round, you will most likely have enough for the Bionic Boomer. Get that, and the Glaive upgrade. Around this point, you'll most likely be unstoppable. But if things get too rough, put out a 3/x boomerang thrower.
- At round 8, summon several WRoDs until your opponent falls or forfeits. If neither, don't fret. Keep sending them until you get a finance of 500+.
- Wait until you can buy the Semi-Automatic Rifle. Make sure to get the Night Vision goggles on Round 12. You'll be hard to take down at this point.
- At this point, just keep your money building up from the finance. once you get 4000, time to put in the Super monkey, if you haven't killed your opponent already. Upgrade it to 2/3, and just send bloons after your opponent until he dies.
- If things get rough, just place down some more 2/3 Super monkeys. No big deal.
- 13. Tran Bach Nguyen (Apprentice(Tier 4), Banana Farm, Dartling Gun - Tier3, Supermonkey):
- Start with a Apprentice and upgrade it to 2/2.
- Put 3 Banana Farms and upgrade them to 1/0.
- Put 2 more Apprentice monkeys and upgrade them to 2/2 and 3/2.
- Upgrade all banana farms to 2/0.
- Upgrade the 2 Apprentice monkeys to 2/3.
- Then if you have enough money upgrade one monkey Apprentice to 2/4.
- Put another Apprentice and upgrade it to 2/3.
- If you want you can upgrade all to full, then you can put 2 Dartling Guns and upgrade them to 3/2 and 2/3.
- Then do whatever you want.
- 14. Could this possibly be the best Agressor strategy ever? (Apprentice, Banana Farm, Optional, Optional)
- Start by placing a Banana farm ASAP.
- Upgrade it to 1/0. Unless you're trying for the extra two medalions, let the bloons leak.
- At round two, place down a 1/0 Wizard Monkey. Do not send any bloons.
- Save up until you get 1200, then buy Lightning.
- Upgrade your farm to 2/0, then place down another farm, preferrably right next to the last one.
- Upgrade that farm to 2/0 as well.
- Place down another wizard monkey. It's recommended to upgrade one of them to 2/2, so you don't get spammed with CLoDs or CPoDs.
- After round 13, send a Non-camo RRoD storm after your opponent. They will most likely not survive the storm.
- If they do, upgrade your Wizards to 3/2, then the banana farms to 3/0, or maybe 3/2? Save up enough money to send a BFB rush against your opponent. They will not survive it.
- 15. Fiery Destruction. (Monkey Apprentice, Tack Shooter(Tier 4 unlocked), Ninja Monkey (Tier 4 unlocked), Optional (works on all maps except hydro dam and zen garden).
- Start out with a tack shooter in a strategic spot.
- Upgrade the tack shooter on path 1 until 4/0.
- Upgrade it to 4/2.
- If you did this correctly, you should have a ring of fire during round 4.
- Start spamming grouped blues x6 until your economy goes up to 500.
- Stop sending bloons and build a monkey apprentice and upgrade it to 2/2.
- Build a 4/2 ninja monkey.
- After this, build a 3/2 ninja monkey.
- Start saving and send a regrow BFB at them around round 20. The BFB will mostly destroy your opponent.
- 16. ROF (Tack Shooter (Tier 4), Bomb Tower (Tier 4 optional), Monkey village/Mortar, SM/Ace Will work on most maps excluding ice floes, hydro dam and zen garden).
- Start with a tack shooter far away from the entrance, somewhere in the middle of the track.
- Upgrade it to 1/0
- Get a cannon
- Send grouped reds up to 300 eco.
- Get another 2/0 tack for round 4.
- You can lose around five lives to blue/pink layering if you get unlucky, but no big deal.
- Save up and buy a RoF - you can get 450 eco by round 6 on most maps. Then sell for a ROF.
- Send eco till round 9.
- Get up camo detect.
- Go for more eco bloons if you have mortar.
- Start buying MOAB maulers up near the entrance of the track after getting around 1200 eco. 4 is all you need by round 26, but it's best to buy as many as possible.
- When you have enough Maulers, if you have bomb tier 4 buy a 4/2 bomb tower in the middle-beginning of the track.
- Then just buy more and more maulers and your ready to rush the oppponent with whatever you want - get around 1000-2000 eco. Then send things for offensive, and you should beat you opponent.
- 17. The troll strategy (Random Towers)
- This is fun and exciting.
- 19. Late Game (Super Monkey, Bomb Tower, Tack Shooter, Mortar(all fourth tier). The goal of this technique is to take unprepared enemies into the late game when they have weaker towers. Be aware that this technique is not recommended for zen garden, golf course or the pool where the paths are too discrete to place these towers correctly.)
- On round 1 place a tack sprayer at point where the path is curved or rectangular at the end of the map.
- On rounds 2 and 3 send grouped reds until your income is 300.
- Between 4 and 5 get a second tack sprayer near the tack sprayer, as grouped blues and some pinks will overwhelm one tack sprayer (do not panic if some pinks leak as reds or blues still).
- Send grouped blues until yor income is blue.
- From here you have two choices depending on the situation.
- Option 1: keep your tack sprayers and go straight to your economy on round 6 and 7 if you know your opponent will not greens or blacks.
- Option 2: If they send these bloons, sell your sprayer closest to the path to get a ring of fire before they harm you.
- Option 1 will help you save money but Option 2 will save you from greens and blacks.
- Either way send grouped greens until you have a income of 500.
- During rounds 8 and 9, if you have not already done so, get a ring of fire and send grouped yellows until your income is 600.
- On rounds 10 and 11 get a mortar up to signal flare and bigger blast for camo detection.
- Place the target as best as possible to keep spaced camo pink exploits to a minimum.
- Between 12 and 16 send unorganized streaks of grouped pinks( the groups of pinks you send each time should be enough to give you +50 income each) until your income is between 900-1100.
- Build a ring of fire and maybe 1-2 tack sprayers when you see the regrow ceramics come(by the way when you build rings of fire, you should always add the range upgrades).
- During round 16 and 17, build two moab maulers with frag bombs for early moab popping power. Follow the economic strategy you did for rounds 12-18 for the rest of the game.
- At some point between rounds 21-24 get a super eyes upgraded super monkey and then a plasma vision once you have 9000 cash. Then save up for a robo monkey while following the economic technique. Be careful of a bfb/combo of bfb and moab rush.
- Build an artillary battery and stall the blimps until the maulers and supermonkey if you have it to destroy the blimps. Then possibly add ring of fires as needed to cope with the ceramics. After you get the robo monkey save up for that 9000 cash that you have been doing to get a artillary battery if you didn't need one for a bfb rush against you to solidify camo detection when camo pinks show up later.
- At this point keep your economy going while saving up for 25000 cash to get a technalogical terror deal with times when moabs and bfbs overwhelm you and you need its annihilation ability. Hopefully by the time you have a tech terror your income is 2500-3300 cash.
- Keep buying tech terrors(with plasma vision as well) while boosting your income until you see the first ZOMG round. If you run into ZOMG rushes time your bloons and buy moab assasians if needed and bloon annhilation abilies to defeat them.
- When your income is in the 8000-100000 ball park, save up for your first sun temple for pure blimp and bloon popping power.
- Use a tech tower, blade maelstrom and 2-3 moab assasian sacrifices for your temples.
- At this point when you reach 110000 income there is no need for more economy and micromanage your purchases of tech terrors and temples.
- To win either hold your opponent out or devestate them with a massive ZOMG rush when your towers cover all spots.
- Here are some tips overall for this strategy.
- In two pathed courses, you can wait on the artillary battery as you will need two signal flares instead to provide detection for both sides of the path.
- Place maulers in a decent spot halfway between both paths.
- Be sure to get a ring of fire under each of the mortar's targets so both directions are covered equally.
- If the end rentangle spot of the end of a one path and direction course is large enough, place your two early tack sprayers on top so you can place two more tack shooters later to save space.
- Tech terrors should always start in the middle of the map for you.
- 20. Super banana wizard strategy (Super Monkey, Apprentice, Banana Farm, Optional)
- Start out with an apprentice, and upgrade it so that you can use the lightning bolt and the monkey sense.
- Spawn three banana farms (preferably closer together), and upgrade all of them with more bananas.
- Wait until you gather 4200+ money and then upgrade the apprentice so that it could breathe fire.
- Upgrade all three of the banana farms so that they are all banana plantations.
- Spawn another apprentice and upgrade it so that it can use the lightning bolt and can breathe fire.
- After you finish making these two fire breathing apprentices, spawn a super monkey and upgrade it so that it can shoot out plasma rays, and has epic range.
- Wait until you have 4500 money then sell all of your three banana plantations, and ONE of your fire breathing apprentice, and upgrade the super monkey to the sun god.
- Now you may sit back, relax, and do whatever you want. Usually what I do after i get a sun god is rinse and repeat the process.
- NOTE: Do not upgrade the monkey apprentice all the way to summon pheonix, stop at dragons breath. Also, do not upgrade it towards the summon whirlwind path, this will screw everything up.
- 21.Back to Basics (Dart Monkey(Tier 4), Tack Tower(Tier 4), Banana Farm(Tier 2).(This does NOT work on Hydro Dam.)
- Start by placing a 0/1 Dart Monkey around the bloons spawn zone.
- Get a Banana Farm and upgrade it to 1/0.
- Continue by upgrading the dart monkey to 0/3, then 1/3.
- Upgrade the Banana Farm to 2/0.
- Place a dart monkey facing a straight track (so the catapult's ball can pop more bloons while rolling), upgrade it to 4/0, and set its target priority to Last.
- Place a tack tower in a loop or curve, trying to get most of it. Upgrade it to 2/0, then 2/4.
- Upgrade your dart monkey to 2/3.
- By the time you get the Blade Maelstorm upgrade, you should be at round 12. If you encounter a rainbow rush, use your special ability to easily defend against it.
- Now you can deal with your enemy as you wish, either let him get owned without sending him bloons, or ending it fast.
- I usually continue by placing around 6 more 2/3 dart monkeys,another 4/0 monkey, another 2/0 banana farm,and another 2/4 tack. After that, I try to get a Super Monkey Fan Club, in case of MOAB bloons.
- Note: Adapt to the situation. If you get yellow rushed at round 8 ( the 4/0 monkey should be there by that time) place another 0/3 monkey, and sell your farm if they can't resist. Don't forget the tower boost thats just 1 point of energy. Don't get fooled into using it if there are only 2-3 waves of bloons coming,though, as you will be vulnerable in several seconds.
22. Impompable ((Dart Monkey (Tier 4), Apprentice (any tier, 4 recommended), (Optional), (Optional).
- First and foremost, place a Dart Monkey with (0,3) upgrades close to the start. Upgrade range as soon as possible.
- Repeat. Typically four is a good standby early in the game.
- Place an Apprentice. Typically this strategy uses a (3,2) tower towards the middle or end of the track.
- Before Lead is available, place an Apprentice (x,x) before the Dart Monkies placed in the first bullet.
- Go back to Bullet 1 and repeat.
- Note: Monkey Apprentices are excellent Anti-Lead and Dart Monkies are outstanding anti-mob (not MOAB) towers alone. Typically players will place only 10 Dart Monkies in total, as to get reliable effectiveness from the Super Monkey Fan Club upgrade.
- Note: Place Juggernaut (4,x Dart Monkey) at any long portion of the track and set it to either last or first, depending on it's position relative movement of Bloons.
- Note: Juggernaut Upgrade allows popping Lead as well, but it is not recommended to rely on this feature.
- Note: It is recommended to 'spam' (constantly send bloons). The additional money income allows a faster closure of the holes in the user's defenses.
- If the user is playing Defense mode, spam money income 'upgrades.'
iOS strategies (Don't try these on a computer)
- 1. RwT (Monkey Engineer, Spike Factory , Banana Farm, Does not work on Hydro Dam.)
- Start with a Monkey Engineer. Upgrade it to 2/2.
- Get another Monkey Engineer. Upgrade it to 2-2 or 3-2 if you have it.
- Spam pinks.
- Put three Banana Farms. Upgrade them to 2/1.
- Put 2 spike factories. Upgrade to 2/2.
- If the opponent has not put camo lead defenses, spam camo leads at round 12. Rainbows (regen or camo) will make the opponent lose some lives.
- If it goes too long, spawn a moab and keep putting 3/2 or 2/2 Monkey Engineers and 2/2 Spike Factories.
- Upgrade the Spike Factories to 3/2 and 2/3.
- Keep putting towers and spawing M.O.A.B's, B.F.B's, ceramics maybe a Z.O.M.G.
- Remember, spawn pinks and rainbows to increase income.
- 2.Anti-farm "aggressor" strategy. (Monkey Engineer, Spike Factory, Heli Pilot)
- Start by placing a Monkey Engeneer near exit.
- Do not upgrade it until round 2 begins (upgrade once time is 0:24).
- Necessary upgrade is 2/0, no need to buy 9-inch nails.
- At the same time send bloons. Start by grouped red and then as a new bloon type upgrades
- Be careful, you may need to place another 1/0 engineer about round 6.
- Keep bloons swarming. Try to get your income to 650-700.
- Now it is aproximitely round 8. Get a heli pilot (1/2). Upgrade it 2/2.
- ASAP get a spike factory near the entrance of the opponent's sent bloons.
- Upgrade in 1/2 or 2/2; that is up to you.
- Upgrade your heli to 3/2 or build 1/0 heli. Beware RRoD! You should be capable of taking down 6-7 grouped rainbows, no problem.
- Now continue raising income by sending pinks/blacks (fast cooldown) till round 17.
- Get the moab shredder spikes upgrade.
- Raise income again (till 1000-1100).
- Now get 4-5 3/1 heli pilots ASAP.
- Raise income and gradually upgrade your heli pilots to apache, no troubles after that.
- 3. Engineer/Apprentice Duo (Monkey Engineer, Monkey Apprentice, Banana Farm)
- Start with a Monkey Apprentice. Upgrade it to 2/0.
- Get a Banana Farm and upgrade it to 2/0.
- Get a Monkey Engineer. Upgrade the Monkey Engineer to 2/0.
- Get another Banana Farm and upgrade it to 2/0.
- Upgrade the Monkey Apprentice to 3/2 and the Monkey Engineer to 3/0.
- Get another Banana Farm and upgrade it to 2/0.
- Upgrade the Monkey Engineer to 4/2.
- Get another Banana Farm and upgrade it to 2/0.
- Continue to put 2/3 Monkey apprentice and 4/2 Engineers througout the map for the rest of the game.
- Once in a while, send out M.O.A.Bs, B.F.Bs, ceramics, and maybe a Z.O.M.G.
- 4. Engineer-free (Boomerang Thrower, Ninja Monkey, Monkey Apprentice): (Does not work on Hydro Dam):
- Start with a ninja. Upgrade it to 2/2.
- Spam reds till your income is $275.
- Get a boomerang thrower and upgrade it to 2/3.
- Get another boomerang thrower and upgrade it to 2/3 as well.
- Send bloons and stop at level 16 or until you reach $500 income.
- Beware CLoD!
- You should be able to destroy a rainbow run if your boomerangs are placed correctly.
- Use a monkey boost if nessesary.
- On level 16 get a apprentice and upgrade it to 1/2.
- If you did not reach $500 income send bloons to make it there.
- Buy a boomerang and a ninja.
- Upgrade the boomerang to 2/3 and the ninja to 2/2.
- Upgrade the first ninja to 3/2. Upgrade the apprentice to 2/2.
- Get another apprentice and upgrade it to 2/2.
- Build a boomerang and upgrade it to 2/3.
- Upgrade your 3/2 ninja to 4/2 and your 2/2 ninja to 2/3.
- Upgrade both apprentices to 3/2.
- Be ready for round 27, 3 MOABs are going to come!
- Get another boomerang and upgrade it to 2/3.
- For the rest of the game add 3/2 boomerangs, 4/2 or 2/3 ninjas, or 3/2 or 2/4 apprentices.
- Upgrade any towers if needed and try to send some MOAB-class bloons.
- Beware a BFB on level 20 and a ZOMG on level 22!
- You should beat a CLoD-free agressor.
- 5. Strategy 5. (Engineer, Apprentice, Supermonkey, Optional).
- 1. Start with 2 engineers. Depending on map place one at the bloon entrance and one at the end. (Not too close to the entrance/exit, but close enough to attack them as they come out).
- Upgrade both with sentry guns only! (1/0) you should have $100, spend this to spam 4 red ballons. If they send bloons green or above you MAY need to get the '9 inch nails' (x/1) upgrade if you are in trouble. But dont go further than this, use energy if you have to, early game is the hardest.
- Spam the Grouped Red bloons until lvl 4, then spam the grouped blue bloons. (Hint: only ever send the bloons on the top, these are the spammable bloons which are released quickly, incresing you income.) Spam Grouped greens and yellows until you reach $500 income. DO NOT GO FURTHER! You can finish sending bloons with leftover money, so you have something like $515, but do NOT go to $600.
- Once there place a mage in a good, central position with lots of access to bloons, prefferably on a corner or repating loop. Upgrade to 2/2.
- Now for the engineer who is upfront, upgrade to 4/1 increased range is not needed as you want your traps as close to the entance as possible (for income). Empty bloon trap as often as possible!
- Save up till you have $4000, Buy a super monkey and place it in the center of the map, good position (his range is great but dont upgrade it yet).
- If you are having trouble with camo bloons upgrade the mage to a dragon's breath, 2/3. Summon tornado, 3/2, is not recommended!
- After this, save and upgrade your Super monkey to 1/0.
- Ugrade your Engineer to 4/1. You can make a new Engineer at the start and upgrade him instead, this will increase income because you will have 2 traps being used at the start.
- Upgrade your Super Monkey to Plasma, 2/0, then simply wait until you can get 3/0 (Sun God). Once you get this, you can send Grouped Black ($150) bloons at them until you have $1000 income. If you are having trouble you can get super and epic range (0/1 and 0/2), but this will kill the bloons before they get to you traps, reducing you income. Get another Super Monkey, this time make him 2/3 (the Robo Monkey). This should give you everything you need to take on the MOAB waves which will come at around lvl 27. If you are stuggling, use an energy on large groups of BFBs.
- This may sound crazy, but then save up until you have $100,000 for the Temple of the Monkey God upgrade (4/x), once you get this, you are unlikely to be beaten. If you like you can send more Grouped Black bloons ($150) to increase income to $2000. Once you have temple, you can make your income as large as you want and fill the map with Robo Monkeys and Technological terrors until there is no space to place anything. Have fun!
- Notes: Weaknesses are any camo that the mage/engineers foam cant handle. Your mage will not have the fire uprage by lvl 12, so a really long, fast wave of camo pinks may kill you if you dont use an energy, if this happens consistently, upgrade your mage to fire before bloon trap, but then bloon trap asap after this. Only other weakness is a lvl 18 moab rush. If your opponent decides to be an annoyance and sends a blue moab, you super will not be upgraded and you may have a hard time. Use energy when it gets in range of ur super and flamemage. If he or she constantly moab rushes, then upgrade your super monkey Before you second bloon trap.
6. Assault Strategy (Tack Shooter, Monkey Apprentice, Heli Pilot, Optional)
Start with a tack shooter, at 18 seconds you can get a tack sprayer.
Send income to get 500 or so, and get a 0/1 mage if you start getting overwhelmed.
Shortly after, get your mage to lightning and (perhaps after more income boosts) get your 3/0 tack up to 4/0.
Return to increasing your Income.
By round 15, you should have approx. 1000 income (use pinks or blacks for best results).
At that point, buy a Heli Pilot and try to get it to 3/2, on Lock in place near the start, then get 16000-ish money (more eco on the way if you feel safe enough) sell your Wizard and get Apache Dartship, put on Pursuit.
NOTE: if you don't have a 3/1-at-least pilot on round 18 then buy a few more tack shooters, up to 0-2/3. At 22, if you have not sucsessfully killed your opponent, buy more Dartships.
7. Noob Banana money strategy (only works on places that hold 3+ farms) (Banana Farm, Apprentice, Super Monkey, Optional)
Place a Mage and upgrade it to 2/0
Collect $1000 to buy a farm and make it 1/0
Make your Mage 2/1
Upgrade your banana farm to 2/0
Save for another 2/0 Mage then make your old one 2/2
Collect money for new farm 2/1
Make your new Mage 2/2
Make another banana farm 2/0 then another third one 2/0
If you made it in time, you can make another banana farm 2/0, otherwise collect 3500 and make a super monkey.
Collect 2500 by income and bananas then make your supermonkey shoot lasers (2/0) then collect 4000
Sell the left banana farms and make 2/3
You'rs almost unbeaten, try to send strong bloons or keep making money and even make your lineup stronger
HAVE FUN!!!
8. Offence and Defense (Monkey Engineer,Wizard,Sub or Heli Pilot) Does not work well in place many ice burg
Wait your money to get $900
Put sub first 1/1
Upgrade sub 2/2
Put Wizard
If reached Level 4 or 8, send Pink Bloons or Yellow Bloons and being so aggressive.
Upgrade Wizard 1/2
Put Engineer
Upgrade 2/0
Upgrade the wizard 2/2
Upgrade sub 2/3
Wait for Dragons Breath or put engineer for sentries or Wizards for camos
Send Bloons
Be aggressive too much
When reach 360+ income charge send MOAB
When you lose 60 income charge, send Yellow Bloon
Add more sentries and Wizards
When Reach 500 income charge, give a BFB
and the rest if not effective keep make your income charge into 3000 and buy ZOMG
8. Income strategy (Monkey Apprentice T3, Monkey Engineer T4, Monkey Sub T3, Optional)
- Place a Sub and upgrade it 2/2.
- Spam bloons until you reach about 400 income.
- If your Sub can't cope during that time, place an Engineer and upgrade it 2/0.
- Place an Apprentice and upgrade it 2/3.
- If you want to, you can upgrade Ballistic Missile on your Sub.
- Place an Engineer and upgrade it 4/2. (If you followed step 3 then upgrade your existing Engineer)
- Place an Apprentice near the end of the track and upgrade it 3/2.
- You can now play offensive or defensive, it's your choice.
9. COBRAs (COBRA unlocked, Assault Mode only)
- Start out with any defense that works. Send income bloons occasionally.
- Once you have a sufficient defense, start massing 1/2 COBRAs. They will drastically add to your income for extra defense AND steal lives. Try to kill your opponent by Round 18.
- If your opponent survives Round 18~20ish, you have several choices. You should make it as early as possible as things can get too late:
- Choice 1: Keep spamming 1/2 COBRAs. Only do this if your defenses are sufficient and if your opponent has lost many lives, as sooner or later your opponent may try something like Regrow BFBs.
- Choice 2: Quit COBRA spam and get a normal defense. Hod out till you win.
- Choice 3: Get one of your COBRAs 1/4. This should prevent your opponent from sending BFBs and under and stall the game for a bit. If your opponent is (let's be honest) stupid enough to send in a Regrow BFB at your defenses, you just won. In that case activate Misdirection immediately and wait for it to leak. If your opponent does not, use it on Round 30 and let your opponent deal with two BFBs instead of one.
- Choice 4: If all else fails and your opponent sends a ZOMG or you reach Round 43 (equivalent to 86 in BTD5) and you don't have proper defenses, try to stall it down as much as possible with SSLs and whatnot so your COBRAs get to win (ZOMGs are slow enough). If even that fails, go nuts and try FSC or surrender.
Playing the "Aggressor" - A Guide to Bloon-Spam
What is the "Aggressor"?
- The Aggressor is a player who aims to eliminate the opponent as soon as possible, and have them be crippled by sending as many bloons as possible in order to try and get more bloons to leak and increase profit. Because of this, the Aggressor often sends out the bottom row of bloons to send, like spaced blues, pinks, blacks, etc., to gradually wear down a bad defense.
- Or, if the Aggressor knows the opponent's four towers or knows the opponent's weakness later on, he/she will stockpile income quickly by sending out the top row of bloons to send, like grouped reds, blues, greens, yellows, etc., then stop sending bloons suddenly. This allows the Aggressor to build up a very large amount of income and money in such a short amount of time. After getting an adequate defense, the Aggressor will send out a giant all-out attack, which will usually knock off all of the opponent's 150 lives.
- But if the Aggressor is not sending bloons, he/she will go Banana Farms. Throughout the game, the Aggressor will keep getting a defense that's just strong enough to withstand the bloons that are being send, by computer or by player. While the Aggressor is doing this, he/she will also upgrade their Banana Farms, and maybe send out the bottom row of bloons to send to overpower the opponent's defense if it's not strong enough. At rounds when the disired bloon sends become available (Often infamous bloon rushes on rounds 8, 10, 13, 15, 18, 20, 22, etc.) the Aggressor will sell his/hers Banana Farms, wether it be one or two of them or all of them. Then the Aggressor will send out a giant rush of all the infamous rushes we know now. (See a later section)
- Or, if the Aggressor knows the opponent's four towers or knows the opponent's weakness later on, he/she will stockpile income quickly by sending out the top row of bloons to send, like grouped reds, blues, greens, yellows, etc., then stop sending bloons suddenly. This allows the Aggressor to build up a very large amount of income and money in such a short amount of time. After getting an adequate defense, the Aggressor will send out a giant all-out attack, which will usually knock off all of the opponent's 150 lives.
The Basics of playing the Aggressor
- Starting out as the aggressor requires a tower which can take down compacted groups of bloons in a short amount of time, or a fast tower. A Boomerang Monkey of 3/2 or 2/3 is appropriate and both can be used for further effect. An x/2 Monkey Villiage is the most obvious way in order for the boomerangs to detect Camo-Leads, which will be covered in a further section, or any tower which can penetrate leads and detect camo bloons to do the same job, such as Cannon Ships or Flash Bomb Ninjas. As soon as bloons are available (Round 2), begin sending them, bottom row or top row depending on your playstyle, as this is an important part of being an aggressor. As the rounds progress, you unlock more bloons, which you should send those which increase your income even more. This will be vital in order to increase your income to a disired amount.
Compounding your Income
- Compounding Income is a cycle which makes the Aggressor effective. You may notice that as you send more bloons, there is an "Income-Change" which is listed alongside the Bloon-Details. You will get the amount of money you have in your "Income Box" every 6 seconds. Once you send a bloon, your income will change accordingly. By sending bloons, this allows you to be able to get more money from your income, and allows you to send bloons, which allows you to have even more of an income increase, and thus the cycle continues. By Round 20, because of the cycle your original income may have quadrupled.
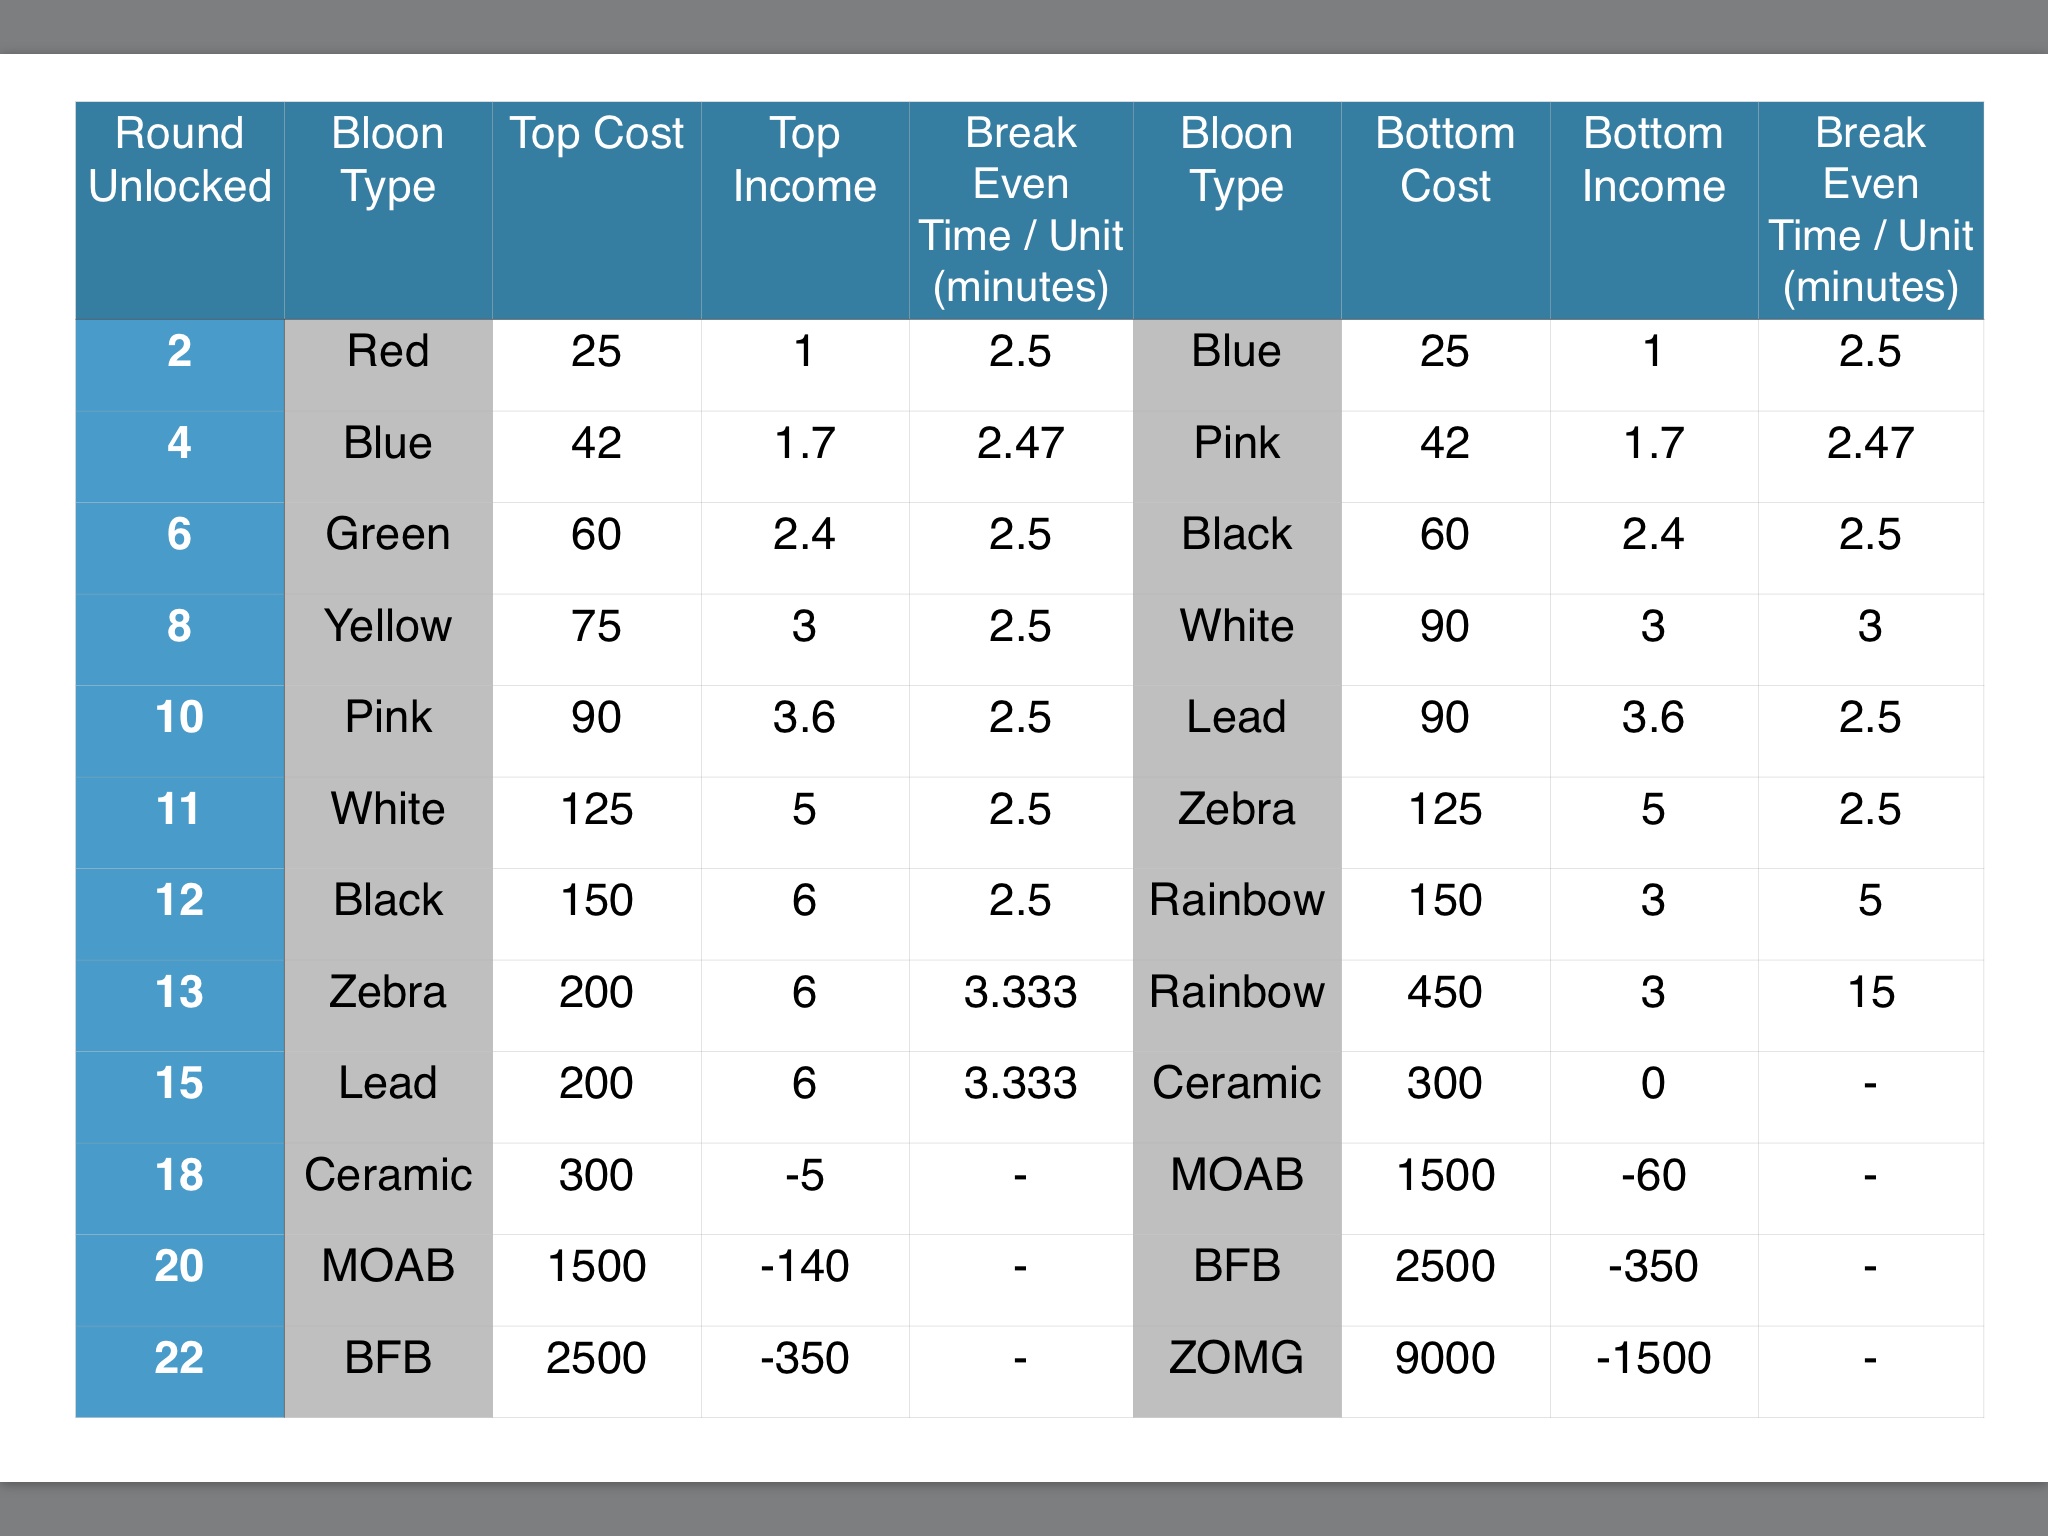
- I made a chartshowing the bloon cost, income change, and break even time (iOS version). The break even time for most bloons is 2m 30s, so don't worry about more economy if you are getting ready to send a rush intended to kill. Formula for break even time: (cost*6)/income change/60. Dire Storm (talk) 18:17, March 31, 2014 (UTC)
PRoDs, BRoDs, RYoDs, CLoDs, RRoDs, CoDs, etc.: Your Best Friends and Worst Enemies
If your opponent has a defence capable of holding off these bloons easily, it is best not to waste money on them. As with every opponent, they will learn from their mistakes if they do get defeated by one of these rushes and improve over time.
- Round 2: GRoD (Grouped Reds of Doom): Sending masses of Grouped Reds will cause towers with low popping power to simply slide past. They will be able to slip through anything from a Dart Monkey to a 2/2 Ninja Monkey as well as earning extra income change for you. Also, this will force your opponents to use money and invest on things like explosives. They are especially more damaging when sent in with other bloons as the cover of reds will shield the other bloons within.
- Round 4: PRoD (Pink Rush of Doom): At the start of the game, abusing Pink Bloons can be devastating if your opponent has a bad defense, especially on short tracks like Hydro Dam and maybe Cards. Though if your opponent can hold off the pinks, try to mix the grouped blue bloons with the spaced pinks. A 3/0 Tack Shooter or a 2/1 Ninja Monkey will usually have the pinks just fly right through the entire track unscathed due to the limited popping power being wasted on all the blue bloons.
- Round 6: BRoD (Black Rush of Doom): This rush involves spaced Black Bloons at the first opportunity. Depending on the track, blacks will either be a total devastation (Hydro Dam) or a circumstantial bloon at best. (Bloontonium Mine, Rally, etc.) Bomb Towers are a popular tower, and these black bloons will easily overrun them if they are alone with no other towers.. Like the PRoD, you can mix the blue bloons with the blacks to inflict massive damage if your opponent has the above mentioned towers, not greens as blacks move at the same speed as greens.
- Don't do so if the opponent has a tower with lots of popping power combined with black popping power, such as a 3/0 Tack Shooter and a 3/0 Bomb Tower, or a 3/0 Bomb Tower and a correctly positioned x/2 Mortar Tower. These can also gradually damage badly-placed 2/3 boomerangs.
- Round 8: RYoDs (Regrow Yellows of Doom), RBoDs (Regrow Blacks of Doom), and RWoDs (Regrow Whites of Doom) are available on this round. As you can tell, this is the first round with real rushes as now regrow bloons are unlocked and grouped yellows as well as spaced white bloons.
- RYoDs are sent to quickly run through towers with low popping power. A 2/3 Boomerang Thrower by itself, regardless of placement, will get overrun by these. A single 2/2 Monkey Apprentice or a single 3/2 Ninja Monkey will also get overrun. A 3/0 Tack Shooter will also get overrun, though do be wary as some opponents upgrade the Tack Shooter to the Ring of Fire, which will pretty much decimate the rush as well as some later bloon rushes.
- RBoDs are sent to overrun towers that are bunched up together. If your opponent has all of their towers on the upper half of the Temple Map, or if they have all of their towers at where the enterance and exit are on the Yin-Yang Map, these Regrow Blacks will soon regrow, and if your opponent has a weak defense, leak and cause great damage. Though don't do this if said towers are too powerful.
- If your opponent has a black-popping tower, but the tower that pops grouped bloons (One 3/0 Bomb Tower, one 2/3 Boomerang, etc.) is too far away from the black-popping tower, then the blacks will regrow in between, putting more strain on the tower that pops grouped bloons.
- A single 3/0 Boomerang Thrower will also get overrun by the regrow blacks, and to increase the potency of the attack, space them out (Send one group, send another group 2.5 seconds later, send one more 2.5 seconds later, and so on.).
- Much like Rounds 4 and 6, you can mix the regrow blacks with regrow yellows, causing massive damage to your opponent if their defense is not sufficient.
- A common killer is sending out a few groups of regrow blacks, then sending out many grouped yellows. What will happen is that the yellows will overlap the blacks, causing low-popping power towers to not be able to pop all the blacks, and if said tower is the only black-popping tower, then some of the regrow blacks, which may or may not have regrown, will go through the entire track unscathed.
- Regrow Whites are very similar to Regrow Blacks: They are send to overrun a defense that has towers bunched up together. Except that Regrow Whites can be sent out four at a time unlike the regrow black's three, the White Bloons have a lower "cost per bloon", White Bloons are slightly faster than Black Bloons, and obviously they are immune to freezing, but vulnerable to explosions.
- See everything the Regrow Blacks can overrun. The Regrow Whites and regrow Blacks are so alike the same towers mentioned above will get overrun. Except that Bomb Towers can already pop white bloons, so the 3/0 Tack Shooter and 3/0 Bomb Tower combination will not get overrun by the Regrow Whites.
- Round 10: RPoDs (Regrow Pinks of Doom) and RLoDs (Regrow Leads of Doom). Regrow (Grouped) Pinks are just like Regrow Yellows, except that they are unlocked later, faster than yellows, and can overrun more towers, such as a single 2/1 Dartling Gun. Although usually Regrow Yellows get the job done just fine, a player can resort to the RPoD if they do not have enough money at the time Regrow Yellows are unlocked (Round 8).
- Regrow Leads can overrun similar towers that can be overrun by Regrow Blacks (See above), except that Bomb Towers are at a lot more risk. Sharp objects can't pop the lead layer, and the Bomb Tower can't pop the black layer. Therefore, if the opponent has a Bomb Tower near the enterance where you send bloons and black-popping power in the very back, the Regrow Leads can easily overwhelm the opponent's defense. Remember that you can also send out regular lead bloons if your opponent does not have enough lead popping power, like a 0/0 Bomb Tower that could whiff.
- Round 12: CLoDs (Camo-Leads of Doom) and RCoDs (Regrow Camos of Doom): Round 12 is a devastating round among players much like Round 8. You and your opponent will need to have full camo detection to survive these rushes that are unlocked on this round.
- Camo-Leads are particularly devastating bloons which are available for you to send at this round. They are one of the hardest bloons to take down due to the relatively few towers that can pop both camo and lead bloons by themselves, and can be either a major threat to your enemy, or yourself if the enemy retaliates. Newer players are susceptible to falling victim to the Camo-Leads due to a lack of Camo-Detecting towers which can pop leads, and will lose quite slowly due to the lead bloon's slow speed. Each Camo Lead when leaked not popped at will will drop 23 lives off either side.
- Regrow-Camos are also particuarly devastating, though they are less popular. You should send out these types of bloons for an all-out attack: Regrow-Camo Spaced Rainbows, Regrow-Camo Spaced Zebras, Regrow-Camo Grouped Blacks and Regrow-Camo Grouped Whites. Any of these bloons will overrun the opponent if they have bad camo detection. One 2/2 Monkey Apprentice or a 4/x Dart Monkey is not enough to fend off these rushes by themselves, and either of these towers will easily get overwhelmed due to the Regrow-Camos constantly regrowing. Although don't send these out if you opponent has a 0/2 Monkey Village or 2/3 Mortar Tower, and instead send out regular, non-camo regrows.
- These may not be mentioned, but sending out lots of camo grouped greens, yellows, and pinks (Not regrow) can slide past certain towers. For example, a 2/2 or a 2/3 / 1/3 Sniper Monkey can't keep up with the constant stream of camo bloons by themselves. A Spike Factory, from any upgrade from 0/0 to 3/3, also can't keep up with the lots and lots of grouped camo bloons, espcecially when all the bloons are "layered". A low-upgraded Ninja Monkey (2/2 or less) can't do much at all to defend all the grouped camo pinks by himself, and lastly, a 2/3 Mortar Tower that's not well-placed will not be able to de-camoize all the camo pinks.
- "Layering" bloons is defined as sending out slower bloons first (In above example, grouped camo greens/yellows), then sending out faster bloons (In above ex., grouped camo yellows/pinks). Because the faster bloons will catch up to the slower bloons, all of the bloons will stacked on top of each other, which makes a great killer for towers that can't handle grouped bloons well.
- Round 13: RRoD (Rainbow Rush of Doom): At the infamous Round 13, you may want to send out as many grouped regrow rainbows to either obliterate your opponent or waste a lot of money due to the opponent's strong defense.
- If your opponent is lagging very badly, even if they have a Sun God, Robo Monkey, or another very strong tower (Which they normally shouldn't have by round 13), it may not keep up with a constant spammage of these bloons due to the massive lag.
- Obviously, if the opponent has a supercomputer or doesn't lag, the tower will pop the bloons just fine. Whole rainbows take 47 lives away. A cheaper alternative is to use the less effective regrow zebras, although much, much more regrow zebras can be sent out due to their low, $300 dollar cost, compared to Regrow (grouped) Rainbows' hefty $675 apiece. Some people may even send in a bunch of camo-regrow rainbows to opponents who have towers who can detect camo so badly that they will keep regrowing.
- If your opponent have 2 2/2 monkey apprentice only or with some other low popping power towers, send 4 groups of regen rainbows at a cost of $ 2700 will overrun them.
- Round 15: CoDs (Ceramic [Bloon] of Doom): If your opponent didn't die after all of the above mentioned rushes, regrow ceramics may get the job done. If your opponent has slow-shooting towers, such as 3/x Bomb Towers or 3/x Boomerang Throwers, then the ceramics will either continue to the end with it's shell still intact (and drop 104 lives off your opponent each), or the ceramic's children will keep regrowing from the slow-shooting towers and most likely kill the opponent. Camo ceramics (Or camo regen ceramics) are also quite deadly if your opponent has bad camo detection, such as a single 2/2 Monkey Apprentice or a single 2/3 Monkey Buccaneer.
- On rounds 18 and after, MOAB-Class bloons can be game-enders, although also Fast-Cooldown (FC) Ceramics.
- FC Ceramics, when sent out in a ~$8,000 rush, can easily catch an opponent off guard, especially when they are preparing for MOABs. One, maybe two 2/3 Boomerangs with Two 3/0 or 3/2 Boomerangs can get overrun by these.
- Specifically an early MOAB sent out right at the beginning of Round 18 against an unprepared opponent without 2/3 Bomb Towers, Super Monkeys, etc. If a weak MOAB defense is present, check regrow to give the ceramic-popping towers a harder time.
- Round 20 unlocks the deadly BFB. This is what usually kills most opponents, specifically those who spend a lot of money to try to get two MOAB Maulers up by Round 18. A regrow BFB is even harder to defend, considering all the ceramics inside. Any sort of weak MOAB defense, one that can barely hold off one MOAB, will get easily overrun. Any setup without x/4 Bomb Towers, 3/x or x/3 or higher Super Monkeys, x/4 Monkey Aces, x/3+ Spike Factories, etc. will have a very hard time combating this.
- Say your opponent has an anti-MOAB defense, such as MOAB mauler spam (About five or more). While a BFB costs less than four MOABs, it moves fairly slowly, and it gives your opponent much more time to react, save up money, micro-manage stuff such as selling-and-rebuying abilities, etc. To unleash a much more surprising and quick attack, consider sending Fast-Cooldown MOABs, which are also unlocked at round 20, in a group of at least five. If your opponent does happen to have five or more MOAB Maulers, then that means that most likely, there will be miniscule "bloon-popping" towers, like 2/3 Boomers and 3/x Bomb towers. The MOABs get popped and the ceramics will rush through, giving your opponent much less time to set up an x/4 Ace or an x/4 Tack Shooter. Though don't send these out if there is many bloon-popping towers on the opponent's side, as the ceramics will easily get popped.
- Keep in mind that MOAB-Class Bloons will practically stop you from earning money as sending them all drain income (unless you use farms to gain income, which in that case 0 income change doesn't matter) and the B.F.B and the Z.O.M.G. are slow compared to M.O.A.Bs, giving the opponent an ample amount of time to set up a last-minte defense, such as a Ground Zero or an arsenal of MOAB Assassins. M.O.A.Bs are the weakest (and cheapest) MOAB-Class bloon though, so at the very least make the M.O.A.B. a regrow M.O.A.B. Regrow BFBs and ZOMGs are also quite deadly due to the mass amounts of regrow ceramics that come out of them.
Defending yourself against the Aggressor:
Don't be Intimidated:
- If the opponent sends out as many red or blue bloons that can be sent, or buys a particular tower in mass quantities, look at the opponents defense as a whole and concentrate on how to beat the opponent (Camo, Lead, Regrow Camo, MOABs, etc.). Also, if the opponent has the bloon decals, keep in mind that it does not affect the bloons he/she sends by any means besides a decoration.
- You can also use the Ice Tower to stall the "natural" bloons that automatically come out each round, thus elongating the rounds and getting more income per round (This does not work anymore as the new updates fixes this). This allows you to have a very developed field by the time each round starts. In addition, this counters the banana farms the agressor might use because each farm generates money based on the round, not its legnth, thus, benefitting income change and hindering farms.
- You can also put all your towers at the very front of the track when you have Banana Farms. What happens is that because your towers are popping the bloons so quickly, the rounds go by quicker, since the game only proceeds to the next rounds when all the "natural" bloons on one player's side are popped. When the rounds are going by so fast, your farms make bananas faster, since farms generate a set amount of money during each round. Thus, when you pop all your bloons quickly, you are helping your farms. This is known as "antistalling"
- Adversely, this "antistalling" tactic hurts players who rely on income change for money. Recall that income change gives you money after six seconds. Also remember that rounds can be sped up by antistalling. For instance, say that in a regular game, it is round 10 after four minutes. However, when up against an "antistaller" on the same track, the game may shift to round 10 after only three and a half minutes, or even three! This means that when you antistall, your opponent, assuming he/she has no farms, gets less money from his/her income in the same amount of rounds.
- You can also put all your towers at the very front of the track when you have Banana Farms. What happens is that because your towers are popping the bloons so quickly, the rounds go by quicker, since the game only proceeds to the next rounds when all the "natural" bloons on one player's side are popped. When the rounds are going by so fast, your farms make bananas faster, since farms generate a set amount of money during each round. Thus, when you pop all your bloons quickly, you are helping your farms. This is known as "antistalling"
PRoDs, WRoDs, CLoDs, RRoDs, CoDs and MoDs: Defend Yourself
- GRoD: There is a simple solution against reds: explosives. They will be able to take out grouped reds (and also anything underneath). Also, a 1/x Apprentice, 2/x Ice Tower, or 3/x or 2/3 Dart Monkey will suffice due to high popping power.
- PRoD: Pinks are very easy to defend against: Fast towers are recommended. Be careful when choosing, as only four towers are allowed and each tower counts. Boomerang Monkeys are particularly popular, more specifically Bionic Boomer and Glaive Riccochet. Also the 3-2 ninja can be good aswell because of how it seeks the pinks and damages them bringing them down to a slower bloon that can be cleaned up by something else such as a ice tower or cluster bomb.
- WRoDs: Regrow whites can look quite daunting, but all that is needed is a better defense. Lots of upgraded Dart Monkeys and maybe a powerful Bomb Tower can dispatch these. Once again, Boomerang Monkeys are used quite often to fend off these rushes, such as another Bionic Boomer/Glaive Riccochet.
- CLoDs: These are harder to defend against. The most effective against this strategy is sufficient Camo detection, such as a 0/2 Village. A 1/2 Sniper Monkey is the Cheapest option to pop Camo Leads, and can be and is used by new and old users. The 1/2 Sniper will need extra towers to pop the Camo Lead's children however. Also, towers like 2/3 Ninjas and 2/2 Monkey Apprintices are fair, but the opponent can also mass a bunch of camo-pinks or camo-regrow rainbows to overrun them. The 2/3 mortar provides some camo detection, but it won't de-camoize all the bloons, and a (grouped) camo-pink rush will have many camo-pinks slide pass the mortar. An x/3 Bucaneer will also do well.
- RRoD: 2-3 Glaive Riccochets or and a Bionic Boomer might just be able to beat a rainbow rush. Blade Maelstroms, 4/2 Bomb Towers and 3/x Ice Towers work just as well.
- CoDs: Juggernauts are good for lower level players as it deals extra damage to the Ceramic Bloon. If not, any tower that attacks fast will easily pop the ceramics. 4/2 Bomb Towers combined with a couple Boomerangs will also work. As for camo ceramics, a 2/3 mortar will not get every single camo ceramic de-camoized, but getting an additional 2/3 Mortar will fix that, or a 0/2 Village.
- MoDs: Do whatever you'd do to defeat this in BTD5, for example MOAB maulers. Remember that MOAB-Class Bloons are unlocked quite quickly, one after another, so if you have enough income, consider some Technological Terrors or Ground Zeros, selling and quickly rebuying, using the ability each time.