Strategies[]
BTD5 Flash Only Method[]
As the name suggests, this is possible only on the web version.
Note: This method relies on Road Spikes a lot. Don't be stingy about them, but don't waste them either.
- From rounds 1-10, get a 3-0 Tack Shooter on the first curve of the track.
- From rounds 11-20, replace the 3-0 Tack Shooter and do the same as Step 1.
- From rounds 21-30, replace the Tack Sprayer with a Ring of Fire and use Road Spikes/Spike Factory to clean up bloons that get past. Lead and Zebra Bloons might only leave behind Red Bloons.
- From rounds 31-40, repeat Step 3. You may buy range upgrades for the Ring of Fire. All children from Rainbow Bloons should be clusters of Red and/or Blue Bloons if 4-2. For round 40, spam Road Spikes to pop Ceramics and the clusters of Red and Blue.
- From rounds 41-45, repeat Step 4. Put a 2-3 Apprentice on Strong near the Ring of Fire to wipe out Ceramics. Use Spikes for loose bloons.
- On round 46, get a MOAB Mauler and if you have the cash, get MOAB Assassin. Then wipe out the MOAB.
- For rounds 47-50, just road spike loose bloons and use MOAB assassin ability when needed. Note that 2 MOABs come on round 50, so road spike the second one.
- For rounds 51-56, replace the lost Apprentice and Tack Shooter. Road Spikes!
- Replace MOAB Bomb tower, maybe get another. Repeat.
- Yay, you won!
Gusterbuster Method, No Leak, No Agents[]
Named after the "Ghostbusters" and the Poltergust 3000 from "Luigi's Mansion", the Gusterbuster method uses the Bloonchipper to drag Bloons into the Bloon Traps of a Monkey Engineer. This is critical to success as it builds your money stockpile needed to beat the "Short Lived" mission.
Note: This method requires a fully expanded Dart Training Facility. The free Dart Monkey every tenth level and the Explosive Dart functions prohibit leakage long term (or, if you playing on deluxe version, use T3 Dart Training Facility + Splodey Darts). Also, you need to be playing on the Mobile, Deluxe or the Steam version of the game.
Tip: I also suggest using the fully upgraded "Starting Money" from the Monkey Lab. It's not required, however, it does help initial efforts. If you want to more frequently use Fast Forward, I also suggest "Starting Lives".
| When | What |
| 0 | Use your first free Dart Monkey (2/3) at Position 1. |
| 10 | Use your second free Dart Monkey (2/3) at Position 1. |
| 20 | Use your third free Dart Monkey (2/3) at Position 2 and add a Glue Gunner (2/2, target Strong) at Position 1. |
| 30 | Use your fourth free Dart Monkey (2/3) at Position 2 and add a Glue Gunner (3/2, target Strong) at Position 1. |
| 40 | Use your fifth free Dart Monkey (2/3) at Position 2, add a Glue Gunner (3/2, target Strong) at Position 1, and add a Monkey Engineer (3/0) at Position 3. |
| 41 | Upgrade Monkey Engineer to 4/0 (from this point on, Fast Forward is not recommended). |
| 45 | Add a Bloonchipper (4/2, target Strong) at Position 4. |
| 50 | Use your sixth free Dart Monkey (2/3) at Position 2, add a Glue Gunner (3/2) at Position 1, and add a Monkey Engineer (4/0) at Position 3. |
| 55 | Add a Bloonchipper (4/2, target Strong) at Position 4 and a Spike Factory (4/2) at the Position 5. |
| 60 | Use your seventh free Dart Monkey (2/3) at Position 2, add a Glue Gunner (4/2) at Position 1, and add a Monkey Engineer (4/1) at Position 3. |
| 62 | Add a Sniper Monkey (3/2, target Strong) at Position 6. |
| 63 | Upgrade Sniper Monkey to 4/2. |
Gusterbuster Simple modified (by safaridor)[]
Thanks to the gusterbuster method for showing me how easy the Dart training facility makes this game. As such, it is required for this method as well because it uses the tier 4 version (or T3 and Splodey Darts on deluxe version) to clean up lead early on. Also, I hope this is more helpful because the gusterbusters is missing the position map for what needs position more then other strategy.
Notes: All towers actions should be done at the end of the round (excluding round 1). Roadspikes might be needed on round 19. This was done on the steam version, and is impossible in mobile version, as you cannot sell towers on short lived in mobile. I have some tokens in popping power, but hopefully that does not make this impossible for those who didn't put their tokens here.
| Round | Action |
|---|---|
| 1 | Dart Monkey 2/2 position 1 first |
| 10 | Dart Monkey 2/3 position 1 first |
| 20 | Dart Monkey 2/3 position 1 last (You will need the max Dart Training Facility for the leads!) |
| 20 | Dart Monkey 2/3 position 2 first (You will need the max Dart Training Facility for the leads!) |
| 30 | Dart Monkey 2/3 position 2 first |
| 30 | Dart Monkey 2/3 position 3 first |
| 30 | Glue Gunner 2/2 position 4 strong |
| 40 | Monkey Apprentice 2/2 position 1 last |
| 40 | Ninja Monkey 4/1 position 2 first |
| 45 | Monkey Village 0/0 position 6 |
| 45 | Super Monkey 0/3 position 5 first |
| 49 | Sell Apprentice and Ninja (you can't sell towers in the mobile and flash version!) |
| ASAP | Upgrade Super Monkey 2/3 |
| ASAP | Upgrade Monkey Village 0/2 |
| 54 | Sell Monkey Village (you can't sell towers in the mobile and flash version!) |
| 55 | Monkey Village position 6 |
| 55 | Super Monkey 2/3 position 5 first (for the mobile version you ill need to buy money!) |
| ASAP | Upgrade Monkey Village 0/2 |
| ASAP | Super Monkey 2/2 position 7 first (upgrade range first) |
[]
This strategy was created by the Youtube user soneakin. (Link to video: https://www.youtube.com/watch?v=V_BDAppbC4A ) Note that getting NLL requires the use of road spikes. I used one pile on Round 10, one on Round 14, and many on Round 47. The round numbers refer to what the in-game round indicator says. When I say replace a tower, it means put a new tower of the same type in the exact same position with the exact same upgrades and target priority.
| Round | Action |
|---|---|
| 1 | 0/0 Dart Monkey above the first U-shaped bend
(left of position 1 in the above strategy) |
| 3 | 0/0 Dart Monkey inside the U-shaped bend on
the far right. Be sure that it covers the straight section to the left! |
| 5 | 0/0 Dart Monkey directly below the track at the
entrance to the second tunnel |
| 8 | 0/0 Dart Monkey at position 7 in the above
strategy |
| 10 | Set the first, third, and fourth Dart Monkeys to
"Strong" |
| 11 | 0/3 Dart Monkey where the first Dart Monkey
was |
| 16 | 2/3 Dart Monkey where the second Dart Monkey
was |
| 21 | 2/1 Glue Gunner where the 0/3 Dart Monkey
was, 2/1 Glue Gunner on "Strong" inside the first U-shaped bend (position 4) |
| 26 | 3/2 Ninja where the 2/3 Dart Monkey was |
| 31 | Replace both Glue Gunners |
| 34 | 1/0 Sniper set to "Strong" at any position |
| 36 | Replace the Ninja and upgrade it to 4/2 |
| 41 | Replace only the Glue Gunner above the
U-shaped bend, upgrading it to 2/2 and putting it on "Strong" |
| 46 | 2/3 Bomb Tower on "Strong" inside the first
U-shaped bend, as close as possible to the turn on the top right. 2/1 Dartling at position 7 |
| 47 | Replace the Ninja, but only upgrade it to 3/1 |
| 48 | 4/2 Bomb Tower to the right of position 6, as
close to the track as possible |
| 51 | Replace the Glue Gunner |
| 52 | 2/3 Bomb Tower on "Strong" as close as
possible to the first one |
| 56 | 1/2 Monkey Village so that it covers both Bomb
Towers and the Glue Gunner. 2/2 Super Monkey at the first tunnel's exit. Upgrade the Super Monkey to 2/3 as soon as possible, then upgrade the village to 2/2 as soon as possible. |
| 63 | 1/0 Ice Tower at position 4 |
| Congratulations! You beat Short-Lived! |
Hubianzhen's strategy (BTD5 Flash)[]
- This is a work in progress, it may or may not be revisited to be finished
Efficiency is key! Save the money you have, as any tower placed down will last for 10 rounds. Plan ahead, and use towers only when you need them.
- Before Round 1: 0-0 Dart Monkey between the upper U bends at the left
- Before Round 3: 0-0 Dart Monkey in the last U bend
- Before Round 5: 0-0 Dart Monkey below the tunnel
- Before Round 11: Replace with 2-3 Dart Monkey, add another 2-3 Dart below the other
- Before Round 21: Replace both 2-3 Darts again
- Before Round 26: Add another 2-3 Dart at the position reaching the last U bend for burst damage
- Before Round 28: Engage leads with 2-1 Glue Gunner at the entrance, behind the first bend (set it to Strong, and it should be able to solo Round 32 leads if done correctly)
- Before Round 31: Add 3-1 Ninja Monkey to reach the last 'U' area
- Before Round 34: Add another 3-1 Ninja Monkey to reach the sections of the track around the middle
- Before Round 37: Add 2-2 Glue Gunner to counter grouped leads
- Before Round 41: Replace with 4-2 Ninja reaching the middle sections of the track
- Before Round 46: Add 0-3 Bomb Shooter, with its range touching some parts of the track (for MOABs due to their hitboxes), and a 4-2 Bomb Shooter next to the Round 41 Ninja
- Before Round 47: Replace 2-2 Glue Gunner
- Before Round 50: Add another 4-2 Ninja for safety
- Before Round 51: Replace 4-2 Ninja for safety
- Before Round 52: Add 2-3 Bomb next to Glue
- Before Round 54: Add 2-3 Ice Monkey in the first 'U' bend
- Before Round 56: Almost there, towers placed in this round and after will no longer disintegrate before the end of this mission. Make sure to have at least a 2-2 Super Monkey and at least a 2-2 Monkey Village ready.
Obsolete Strategies[]
[]

Gamerunknown's Strategy[]
A variant on 8992's strategy below. Instead of boomerang throwers, produce dart monkeys - one before the first level, another before the third, another before the fourth, another before the seventh - try and place them so they can shoot at three different lanes. Ensure there are ten dart monkeys for level eighteen. After level nineteen place a glue gunner between the two parallel lines opposite the bush (and place subsequent glue gunners here and set them to strong). After twenty-three place a spike factory instead of a ninja monkey in the bottom left corner, just before the exit. After twenty-nine place another glue gunner. Use one spike before the exit on level thirty-one. After thirty-three place one spike factory near the exit and another in middle of the alcove on the right of the map (in order to prevent full regeneration of heart balloons). After thirty-nine place a 3/1 glue gunner (crucial for ceramic balloons). During forty-two place seven spikes near the exit. After forty-four place a 1/1 spike factory near the exit and another near the alcove. After forty five place a 1/2 monkey village at the top right hand corner of the initial path, where the balloons first begin to move to the bottom of the map. Place a super monkey below it and more towards the middle, gauge where to place by shooting area. Stay on "first" if there are no MOABs on screen, swap to "strong" if they appear and spike judiciously if multiple MOABs appear (glue gunner will be providing a large amount of popping power, about twelve spikes will be sufficient to pop a MOAB assuming other balloons don't interfere). Make another 3/2 glue gunner after forty-nine. After fifty-five make a 1/2 monkey village and a 2/1 super monkey in the same location. You may also wish to place a 2/0 ice factory, to be upgraded when possible to 3/2 (ensure you have funds for a 3/2 glue gunner after fifty-nine though). After this I found it useful to buy a mortar tower (0/2 -> 3/2) aiming for frozen balloons, then a tack shooter (to strip frost immunity) and a bomb tower (0/2 -> 2/3). These were all placed to benefit from the monkey village. I also made a spike factory in the alcove, which I upgraded to 1/2 on level sixty-five.
The 8992's Strategy[]
a1 = after round 1, ASAP = as soon as possible, usually during a round. Make sure you buy and upgrade in the order specified. Use Road Spikes where necessary.
| Round | Towers/Upgrades |
|---|---|
| 0 | Boomerang Thrower 0-0 Position 1 |
| a1 | Boomerang Thrower 0-0 Position 2 |
| a10 | Boomerang Thrower 0-3 Position 1 |
|
a19 |
Glue Gunner 2-2 Position 3 |
| a23 | Ninja Monkey 0-0 Position 4 |
| a29 | Glue Gunner 2-2 Position 3 |
| a33 | Dartling Gun 1-1 Position 4 |
| a39 | Glue Gunner 3-2 Position 3 |
| a45 |
Monkey Village 0-2 Position 5
Super Monkey 0-2 Position 6 |
| ASAP | Upgrade Super Monkey to 0-3 |
| a49 | Glue Gunner 3-2 Position 3 |
| a55 |
Monkey Village 0-1 Position 5
|
| ASAP |
Upgrade Super Monkey to 1-3
Upgrade Super Monkey to 2-3
Upgrade Monkey Village to 2-2
Dartling Gun 3-1 Position 4 |

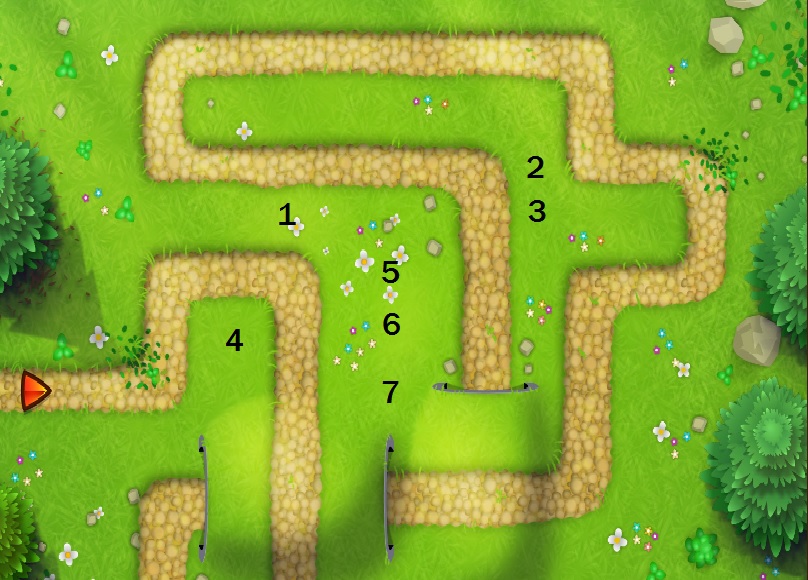
Positions for towers (The 8992's strategy)
I used Road Spikes on these rounds: 31,33,42,45,51,54,57. Make sure you get the positions of the towers right or this strategy won't work.
| a59 | Super Monkey 0-3 Position 2 |
| ASAP |
Upgrade Super Monkey 2-3 |
A Bloons Wiki Contributer's Idea:
Why not use a tier three dart village? You will be able to replace the dart monkey when it disappears.
Some Random Guy's Thoughts:
I've tried this strategy a lot, but I always die at round 57, due to the fact that I don't have nearly enough money to keep up with the guide. I don't know if I'm doing something wrong, or it just doesn't work